

Starting a blog can be confusing and there are so many things you need to learn about. From website hosting to WordPress vs Squarespace, creating an email address, making your site secure with SSL, to choosing a design and more. So it can be very easy to get overwhelmed and not know where to begin!
In this guide, I have broken down all the key steps you need to take to get your blog online. Grab a cup of coffee, pull up a chair and let’s get started!

DOMAIN NAMES
Choosing and buying a domain name is one of the most important steps in setting up your new website! Before you can start building your website you will need to register your domain name, which is where your website will live on the internet (www.yourwebsite.com). This is a very important decision, so be sure to give it a lot of thought.
Here are some important points to keep in mind when brainstorming and buying your domain name:
TRY TO GET A .COM DOMAIN
Getting your first choice of a domain name can be tricky because it will seem like most of the good domains ending with “.com” are already taken. Virtually all one-word domain names were snapped up a long, long time ago. However, it’s worth the effort to try and find a .com domain name you like.
When browsing the Internet and looking for reliable information, are you most likely to trust a website ending in .com or some new domain like .blog or .shopping? Personally, I wouldn’t feel comfortable entering my credit card or buying an expensive product from some sketchy domain!
There are some exceptions, with some tech startups opting for new domains like .io or .co, but don’t get too fancy here. Pick a .com and go with it!
HOW TO FIND AN AVAILABLE DOMAIN NAME
As mentioned, almost every common one word .com domain will have been taken, and if a one-word domain is available there is probably a reason why (hint: it’s not very good). However, there are still plenty of great domain names out there as long as you are willing to be a little creative. There are several websites that help you search for available domains and can generate domain names based on ones that are available.
One of my favorite site name generators is NameMesh.com, where you can enter multiple words to find available related domain names. For example, if you were writing a blog about Vegetarian Recipes, you could simply type in “Vegetarian Recipes” to NameMesh and look at their recommendations. Try to focus on domain names ending with .com that are easy to spell, so look at the “Similar” and “SEO” categories in Name Mesh first.
Other recommended Domain Name Generator tools include:
These tools can help you come up with creative multiple word domains and check availability at the same time.
WHAT TO CONSIDER WHEN PICKING A DOMAIN NAME
Besides looking for a domain ending in .com, here are a few more tips to keep in mind:
- Keep your domain name as simple as possible. Shorter names are easier to remember, especially when you tell people the name in person or over the phone.
- Don’t use weird spelling variations. A good rule of thumb is someone should be able to correctly type in your domain name in a maximum of 3 tries, obviously aiming to get it correct on the first try. It might look cute to change the “i” to a “y” in “TheBycycleBlog.com”, but no one will be able to find it!
- Similarly, don’t use overly complicated or hard to spell words. Domain names are not the time to show off your college English degree. It’s completely ok to be “TheHappyCook.com” and not “TheExuberantCulinarian.com”.
- Try to avoid dashes in the URL. It can be tempting to go for a URL with a dash separating two words you really want, but it is more difficult to say and people will accidentally go to the version of the site without the dash.
- Don’t use a name that will date such as The Student Traveller, or The Thirty Year Old Traveller, or Travelling Before Kids – what if you have kids and want to change to family travel articles? Choose a name that can grow with you!
- Don’t use geographically limiting names, unless you plan to only write about one specific destination.
- Pick a name that is descriptive. If it is possible, try and select a name that is representative of what you will be blogging about to help readers understand what to expect from you, and perhaps also for SEO purposes.
- Never buy a used domain name. It will likely be expensive, overpriced and you don’t know the history of the domain. It could have been used by someone who spammed the domain for backlinks and ruined the SEO.
- If you can’t come up with something unique or descriptive of your blog, you could simply use your own name. For many blogs, you are the brand and its perfectly ok to use your own name – more details on this below.
Even when you find the perfect domain name, you want to be sure you can get it across other social channels as well! You will want to register the same name on Facebook, YouTube, Twitter, and Pinterest.
A great tool to check if your desired name is available across all the major social media platforms is NameCheckr.com. Type your name in and NameCheckr will automatically search all the major social networks and show if the name is available for registration or not.
Don’t be too discouraged if your ideal name is taken in 1-2 places because you can always do a slight variation of it for that particular platform, like adding an underscore in the middle or at the end.
USING YOUR GIVEN NAME AS YOUR DOMAIN NAME
Remember back in the day when you were supposed to remain anonymous online and use a secret screen name or email to protect your identity? Yeah, throw that out because social media has completely changed the online landscape.
Today, your name is a valuable branding tool, so use it! Many people, myself included, simply use their names as their domain and then build a website around that.
Obviously, if you are building a website for a business or a community you probably don’t want to use your personal name and are better off with coming up with a creative name as discussed above. However, if you are building a personal brand and blog, using your name as the domain name could be a great answer.
The Benefit of Using Your Own Name
There are several benefits to using your own name as your domain and your brand. First, your audience will begin to identify with you personally, which builds trust and recognition. In turn, this makes your audience much more likely to keep coming back to your website, sign up for your email list or buy products that you recommend.
Second, it gives you the freedom to take your website any direction you want since the main focus is you and not a niche. Targeting a niche name like “TheHappyCook” is great if you know you want to focus on that niche forever, but what if one day you want to focus on travel or fashion? Then your catchy domain doesn’t really fit anymore, but if you branded under your name you can take your focus in any direction you want.
Finally, YourName.com is probably available if you have a somewhat unique name! Even if it’s not, you can easily throw in your middle name or initial and find an available .com domain with your name. This way you get a readily available .com domain name, begin to brand yourself and start building a loyal following!
The downside of starting with your own name at the beginning is that it will be hard for people to determine what your blog is about. For example, if someone saw the name of my blog beckyvandijk.com and knew nothing about me, they would have no idea if it’s a business website, a travel blog, an educational site, or a portfolio site.
Over time as you build up your brand having your own name is ok, but this is something to be aware of in the beginning depending on what your blog will be about.
WHERE TO BUY YOUR DOMAIN?
You’ve done your research, come up with a great domain name and made sure it’s available both for your website and your social channels. Next, it’s time to buy it!
You have two options here that I will dive deeper below, but for now, it’s enough to know you can either buy it separately from your hosting or buy it at the same time as your hosting.
I prefer to buy both my domain name and hosting all at once through Siteground, but it’s perfectly legitimate to buy it through a simple domain registrar like Namecheap. If you have no idea what hosting is or are tempted to get hosting with that TV commercial you saw (spoiler: do NOT use GoDaddy!), keep reading to the Hosting section below.
Now that you’ve bought your domain name, it is yours forever. I recommend setting up auto-renew so it renews itself each year, that way you don’t forget. Once you’ve bought your domain, move onto the next section: Hosting!

HOSTING YOUR WEBSITE
Website hosting means you pay another company to “host” your domain name online where your website will live so people can visit it. Think of the domain name as the address and the host as the actual building. The host is where your website files will live and be served to visitors, so it’s important to pick a good quality, reliable, fast host.
SITEGROUND
I’ll cut right to the chase: I highly recommend Siteground and personally use them for my websites. They have amazing customer support, great speed, and reliability, and are very reasonably priced.
Website speed is one of the most important factors considered by Google, and Siteground regularly ranks at the top for their hosting speed. Siteground’s customer support is second to none, and I love that they have an online chat feature so you can reach someone right away at all hours of the day.
If you are just starting out with website hosting, I recommend Siteground‘s middle “Grow Big” package, which is $5.95/month for the first year. Yes, it’s really that cheap for top-notch hosting!
The Grow Big plan has everything you need to get started and will last you a long time, including plenty of website space, free backups, free SSL (security certificate), and more. You can also buy your domain name through them while signing up for an additional $14.95/year, or they make it very easy to link your domain if you bought it from another provider like Namecheap.
BIGSCOOTS
BigScoots is not as well known as some of the other providers, but I recently put one website with them and have been very impressed. They are a more expensive provider with plan starting at $34.95/month and are probably better suited for when your website has lots of traffic (100,000+ monthly views), but they scale extremely well to these higher traffic numbers where some of the other cheaper hosts might struggle.
BigScoots will do a bunch of technical customizations for you to get your WordPress site running fast on their WordPress Managed Hosting plan. They offer many premium options for free, including staging sites, daily backups, and SSL, along with great support to help get the most speed out of your site.
A NOTE ON AFFILIATES
Full disclosure: Many people recommend certain hosting companies based on how much affiliate commission they pay and not necessarily because they are the best provider. I personally use Siteground and BigScoots (and yes, those are affiliate links if you find this guide useful and want to use them!), and would not recommend a company simply because they pay the highest commission. Make sure to do your research and just because you see a blogger recommending a host does not mean they even use that host themselves!
If you do venture off to a different host, it’s worth it to spend a little extra and get the middle or upper-tier plans. Exact features vary from host to host, but the key things you are looking for are 1) Free SSL certificates, 2) Free Backups, 3) One Click WordPress Installs, and 4) Ability to host multiple websites on one account. Siteground includes all of this in their middle “Grow Big” plan, so you really can’t go wrong with that plan.
WEBSITE HOSTING COMPANIES TO AVOID
Listen, I don’t like to bad mouth anyone. We all have bad days and sometimes aren’t up to our best. However, this doesn’t apply to website hosting and I have absolutely no problem telling you to avoid GoDaddy.
You have probably heard of GoDaddy because they advertise more than most of the other hosting companies. However, I have personally had multiple terrible experiences with them when I first began my blog journey.
GoDaddy’s support was difficult to get a hold of, often making me wait up to an hour to get someone on chat if I got someone at all. If I finally did reach someone, they simply tried to upsell me on a new, more expensive plan and did not help me fix my problems.
Even worse than this, I originally used their hosting plan for my domain emails, I spent over a year where emails would disappear, never reach a recipient or I never received them, even in the middle of an existing email chain. This was extremely problematic and whilst I can’t say for sure it was their issue, many other people using Go Daddy say the same thing…
They also charge for basics like SSL which most other companies give you for free. Let my pain be a lesson and I strongly recommend you sign up for Siteground on day one so you don’t have to go through the pain of migrating your site off GoDaddy. Seriously, friends don’t let friends use GoDaddy.
NEXT STEPS
Congrats, you now should have purchased 1) Your Domain Name and 2) Your Hosting. This means we are ready to move onto the fun part of actually building your website!

WEBSITE SETUP
Now that we have your domain and hosting, it’s important to start your website journey on the right foot. This means setting up some essential features, including 1) Two Factor Authentication, 2) Website Security Certificate (SSL), 3) Automatic Website Backups and 4) Email Addresses.
Specific setup of each of these will vary by your hosting provider. However, if you followed my advice and signed up with Siteground, then all of this will be very easy and best of all absolutely free.
SET UP TWO FACTOR AUTHENTICATION
The first thing you should do with any important online account is setup Two Factor Authentication. If you don’t know what Two Factor Authentication is, I’ll give a brief overview:
Two Factor Authentication is a simple added security step which prevents you from getting hacked. When you log in with your username and password, Two Factor Authentication will ask you for a time-sensitive code. This can be from an Authenticator App on your phone or an email/SMS that contains a one-time use code. I use the free Google Authenticator app and it stores all my authenticator codes in one place.
This means that even if someone has stolen my username and password, they still won’t be able to access my accounts without the one-time code from the Authenticator app. This should always be one of the first things you set up, whether it is for your online banking, credit card, Instagram, and yes, your website hosting account!
Siteground offers free Two Factor Authentication simply by clicking the box in your profile and setting it up with your Google Authenticator app. You can read more about Two Factor Authentication on Siteground.
MAKE YOUR WEBSITE SECURE WITH SSL
Now that your account is secure, it’s time to make your website secure as well. SSL means your site will appear as secure to visitors and is essential for all websites today. Google has started penalizing websites that are not secure and shows a big “Not Secure” warning if a website does not have an SSL certificate, so you want to be sure to set this up right away.
While this sounds complicated, Siteground makes it super easy (and free) to set up SSL on your website:
- Login to Siteground – My Accounts – Go to cPanel – Security – Let’s Encrypt
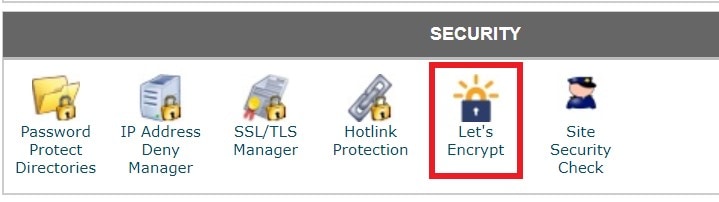
- Click Let’s Encrypt, then scroll to “Install New Let’s Encrypt Certificate”. Choose your domain, tick “Let’s Encrypt SSL”, then click Install.
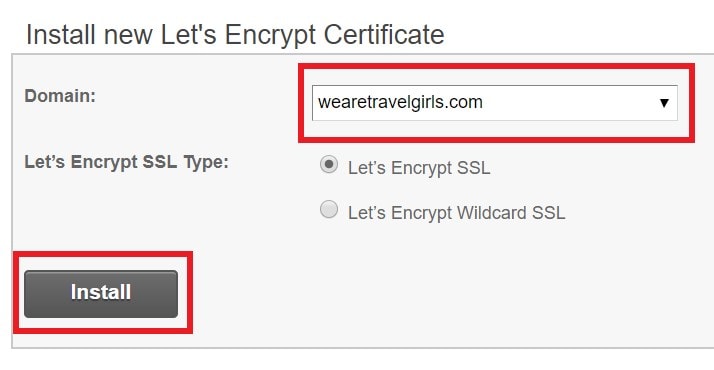
That’s it! Your site will appear as secure and this certificate should automatically renew every 3 months for free. If you have any questions or problems, be sure to open a tech support chat with Siteground and they will help you out with any issues.
WEBSITE BACKUPS
You always want to have your website backed up. There would be nothing worse than losing your website to a bad update or a hacker and have nothing to fall back on!
Luckily, most major hosts now offer free website backups. Make sure this is set up, and if your host does not offer free backups then I recommend using the free “Updraft” plugin.
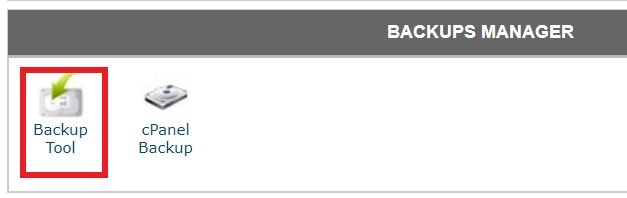
Assuming you are on Siteground, daily website backups will be created automatically. You can also trigger an update by going to My Accounts – cPanel – Files – Backup Tool. In the Backup Tool you can see your latest backups with options to restore them or create a new backup.
EMAIL ADDRESSES
We are planning on having our blog look professional, and nothing says amateur quite like using your @gmail.com email address for work emails. Now that you own your domain, you should definitely set up a yourname@yourwebsite.com and use that for all website communication.
I personally recommend using GSuite for your website email, though there is a small added cost. You can use this code TCJHVD7LR6AWRLD to get 20% off your first year.

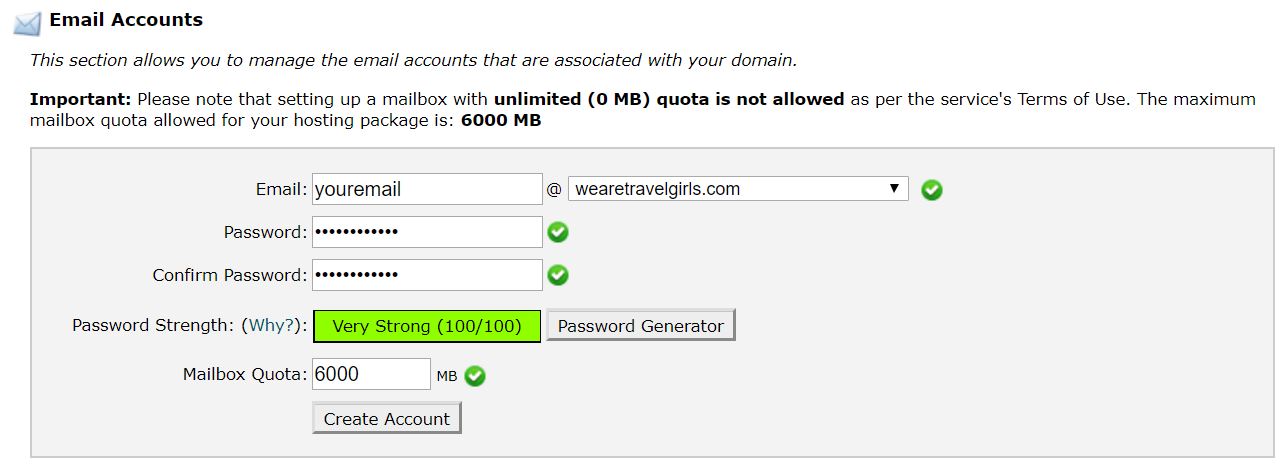
If you want to set up your email for free, simply follow the Siteground tutorial. All you have to do is go to My Accounts – cPanel – Mail – Email Accounts.

From there, you can enter the email address, password, and storage limit (I recommend setting the storage limit to unlimited or the maximum allowed by your hosting plan).
You can also send and receive email from your new email address by following the Siteground Gmail instructions.
Congratulations! You now have protected your account with Two Factor Authentication, set up your website to appear as Secure, have automatic backups, and creating your own professional-looking email address. With these important first steps out of the way, we can move on to the fun of installing WordPress and starting to build your website!

WHAT CONTENT MANAGEMENT SYSTEM SHOULD YOU USE?
The internet and blogging have come a long way in the past 20 years. You no longer need to know how to code to get a great looking website online. Sure, having some HTML and CSS knowledge can help a bit, but you don’t need to have to know what those even are to get your site up and running!
One of the main reasons it’s SO easy to get up and running these days is by using a Content Management System, or CMS for short. A CMS is an all in one platform that makes it much simpler to get your website pages and blog posts online, simply by clicking on “Add Page” or “Add Post” button and following the steps just like you are using Microsoft Word!
SQUARESPACE VS WIX VS WORDPRESS
There are many CMS options to choose from these days, including WordPress, Wix, and Squarespace. Each has its pros and cons, but I strongly suggest using WordPress.
While Wix and Squarespace might have a slightly simpler upfront setup, you will find that they are much more limited in the long run. Believe me, you do NOT want to build your site on a different platform and have to change to WordPress later.
Wix and Squarespace might be fine for a little local shop or a website that doesn’t get much traffic, WordPress is much better for a long term blog with thousands of views each month, and that’s where we want to get you so start off on the right foot with WordPress!
It’s worth a little upfront learning curve of using WordPress (which I will walk you through in this guide) and not be limited by the lack of options in Wix and Squarespace. WordPress is getting easier to use every day with its own drag and drop page builders and thousands of beautiful themes to choose from. While Wix and Squarespace websites all look very similar, it’s possible to customize your WordPress site as much or as little as you want.
WORDPRESS.COM VS WORDPRESS.ORG
The main thing that confuses people with WordPress are the two versions floating around the internet: WordPress.com and WordPress.org.
WordPress.com is a page builder site similar to Squarespace that locks you into using WordPress.com as your hosting provider and does not give all the great functionality I just talked about. Sufficient to say, you do NOT want to accidentally sign up on WordPress.com!
Instead, you want to start with WordPress.org, which means you can use the WordPress framework with any hosting provider like Siteground. All major hosts make this very easy and will install WordPress for you.
As long as you picked one of the hosts discussed above, you will be able to install the proper version of WordPress directly through them for free. Siteground recently launched their new Installation process, which makes it incredibly easy to install WordPress on your new account:
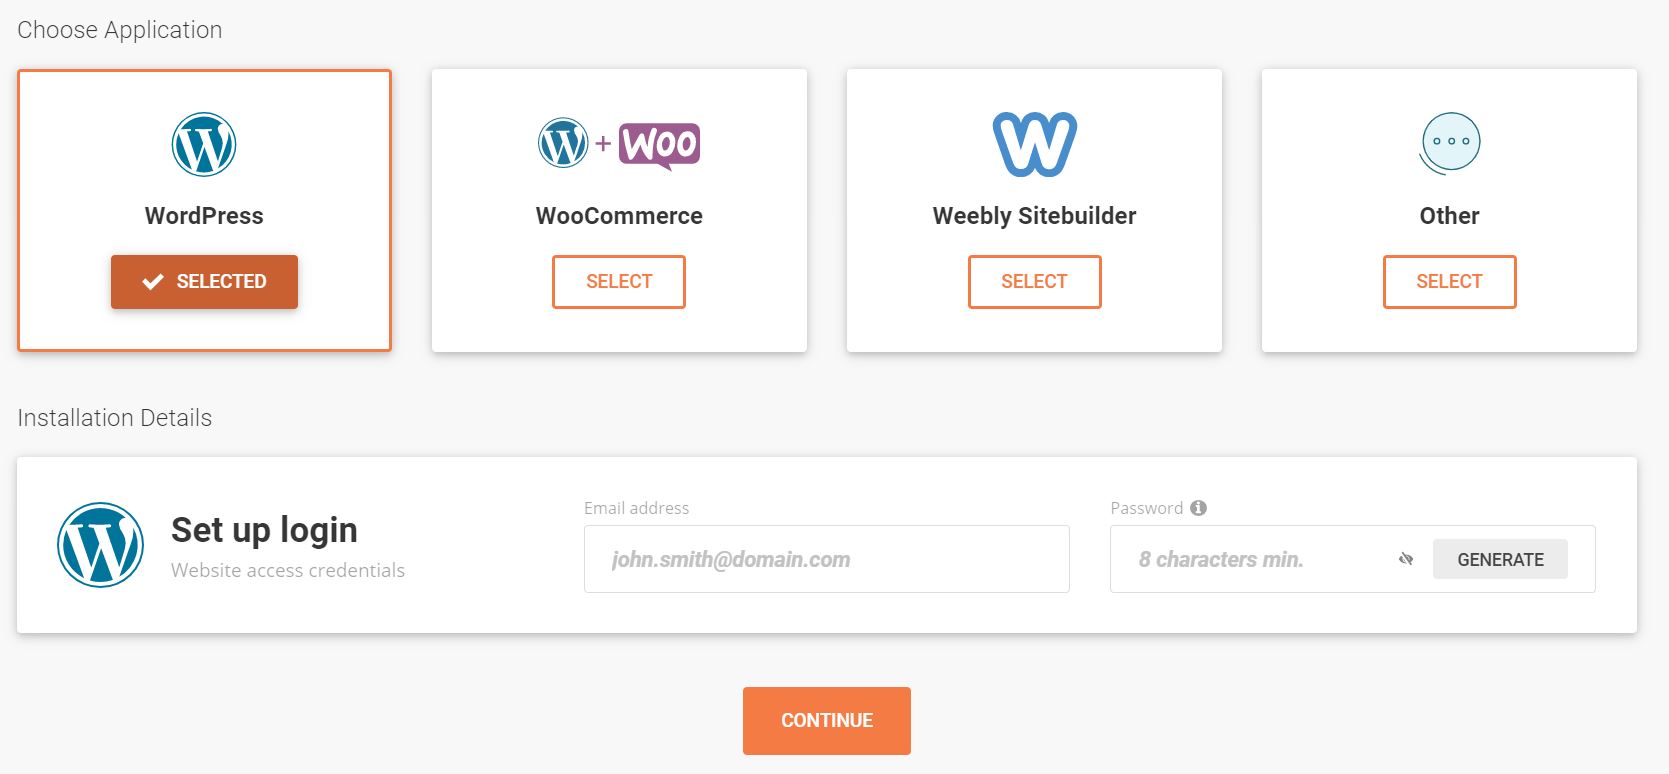
Seriously, that’s it. Click WordPress, enter your email and password you will use to log in, and click Continue. Siteground will do the rest and you have WordPress installed on your website. As we say in England, easy peasy lemon squeezy!
GETTING TO KNOW WORDPRESS
WordPress is very easy to use but it is confusing when first getting started. I struggled with a lot of the WordPress terminology when launching my first websites and wish I had a helpful guide to walk me through some of the basics.
WHY WORDPRESS?
WordPress has been around for years and is used by everyone from tiny blogs just getting started to massive websites like TechCrunch, Variety, and Etsy. WordPress can be as simple or as complicated as you want it to be, and you can easily change “themes” (which determine the design of the site) and add plugins if you are looking to add new functionality to your website.
Simply put, WordPress will make your life a heck of a lot easier for managing your website as an all-in-one system that handles everything from publishing new posts, optimizing images and Search Engine Optimization (SEO), and designing your site.
After you have installed WordPress on your website through your host, you will log in at yourwebsite.com/wp-admin with the username and password you choose during the WordPress installation. Next will be customizing the look and feel of your website with a theme!
WORDPRESS: THEMES AND PLUGINS
Once you have WordPress installed, the next thing to do is to start building your site! You will install a theme, some plugins, and start writing your content.
All this talk of WordPress, themes, and plugins might be a little confusing, so I’ll break it down with a car analogy. Think of the WordPress software itself as a car’s engine: this is what makes the car (or website) run and function. Around the engine you have the car body: this is the theme in WordPress. The theme gives the design, layout, color, fonts, and styles to your website.
Finally, you have various options like leather vs cloth seats, Bluetooth, etc. These are the functionalities provided by the plugins, and unlike a car, you can easily swap these in and out on a WordPress website! Finally, your host (like Siteground) is the car garage where the car is stored.
There are more details to each of these, but thinking of WordPress as a car engine, the theme as the car body, and the plugins as the car options give you a working high-level overview.
WHAT TO LOOK FOR IN A WORDPRESS THEME
Now that you understand what a WordPress theme is, the next decision is picking a good theme and installing it. By default, WordPress will install a very basic free theme called Twenty Nineteen.
In our car analogy terms, these free themes are bicycles: they will get you from point A to point B, but they are not flashy. For our website, we want a Ferrari and not a bicycle so let’s look at some good theme options!
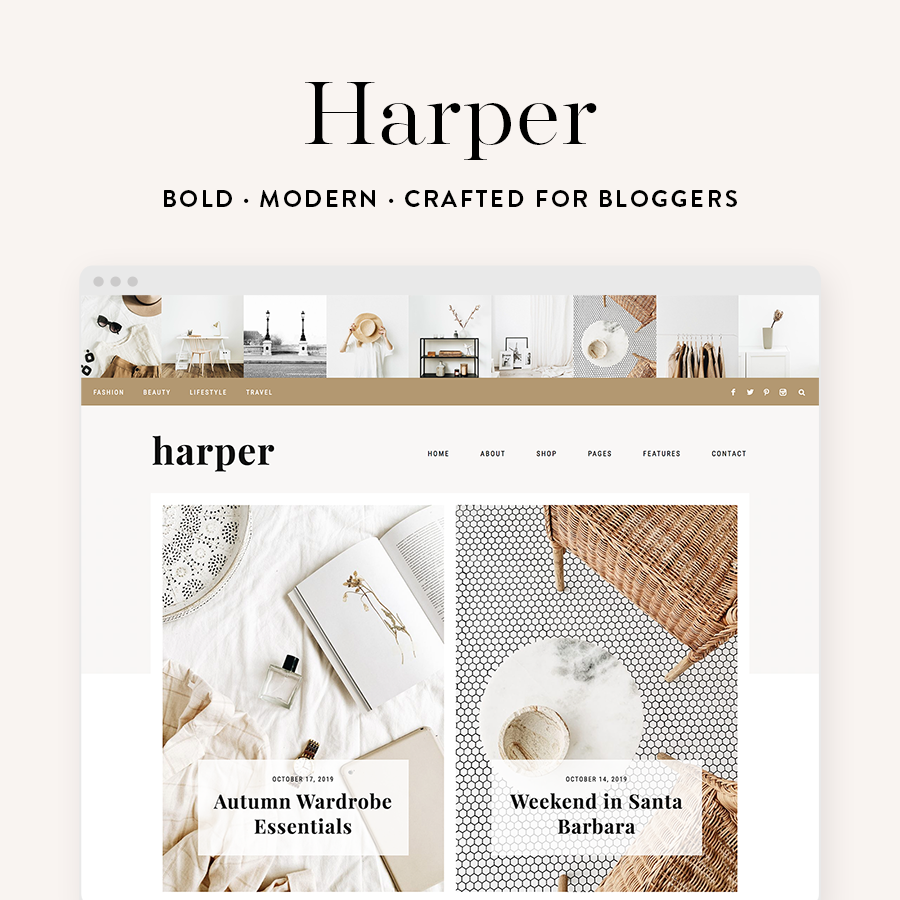
There are hundreds of different themes, both paid and free, and the best one will depend on the goal of your website. Spend some time looking at the top-selling themes on Themeforest.net and CreativeMarket.com as these have likely been around a long time and will have good support.
Most top-quality themes will have working demos of the themes online so you can see what the website will look like. Keep in mind you can always change the fonts, colors, and layouts of the themes, but starting with a theme that looks as close as possible to your ideal site will make customizing it that much easier.
SPECIFIC WORDPRESS THEME RECOMMENDATIONS
Picking a WordPress theme is a very personal choice that will depend on the design and goal of your website. For example, a fashion blog probably wouldn’t look for the same design or functionality as a barbershop. Some specific themes that have good reviews are:
INSTALLING YOUR WORDPRESS THEME AND CHILD THEME
Once you have selected your theme, go ahead and buy it. You will be given a link to download the theme files to your computer, likely in a .zip file.
Next, we will install the theme on your website. Once you have downloaded the zip file, go into your WordPress Dashboard – Appearance – Themes:
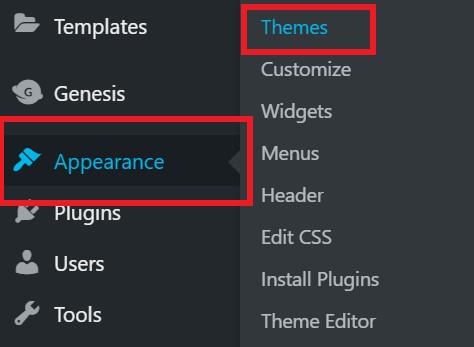
Then click Add New
Then you can upload your new theme
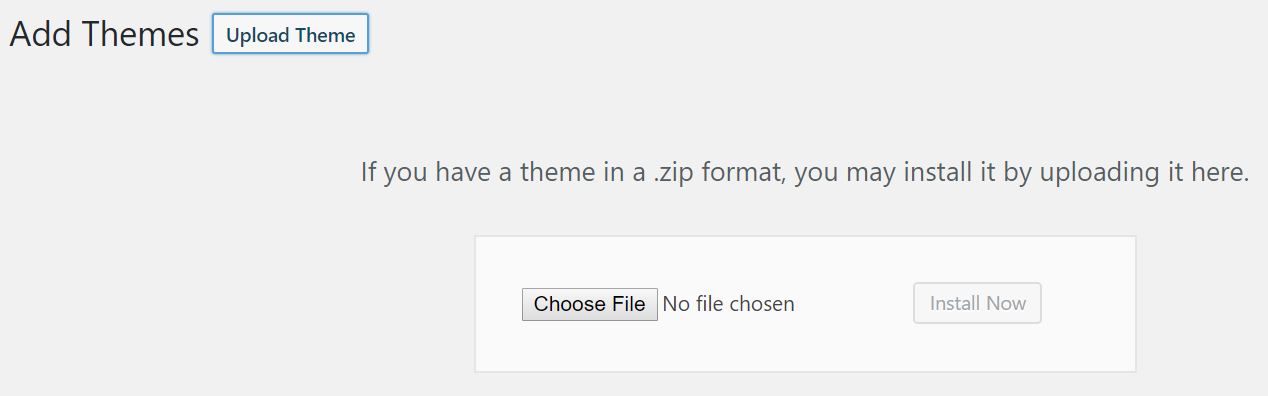
Finally, go back to your Appearance – Themes, find the new theme you uploaded and click Activate.
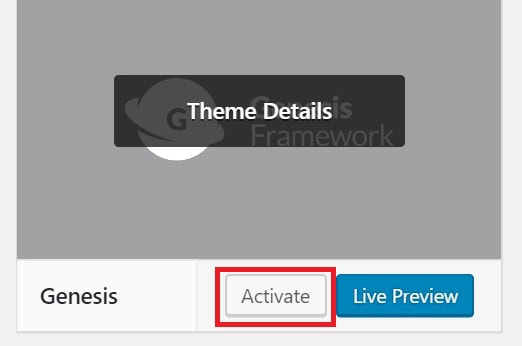
Your theme is now installed and live on your website!
INSTALL YOUR CHILD THEME
One important step many people forget when setting up their theme is to install a child theme. Without getting too technical, a child theme is a copy of your main (“parent”) theme that you can make changes and edits to without breaking the main theme. When an update is released for your theme, you can safely update without overwriting any changes or customizations you’ve made in your child theme.
All major themes these days include a child theme and instructions on installing it. It’s not important to understand the intricacies of the child theme, just know that you want to use one so you don’t accidentally overwrite any of your changes when a theme update is released!
You install the child theme the same way you installed the parent theme, going to WordPress Dashboard – Appearance – Themes – Add New – Upload Theme. The child theme will likely be in its own .zip file named theme-child.zip.
It’s important to remember that the child theme will only work if the parent theme is installed (WordPress can have multiple themes installed, but only one theme is active at one time). Upload the child theme and activate it, then import some demo content!
IMPORT DEMO CONTENT
Depending on the theme you purchased, it will likely include access to demo content, which you can directly import into your site to get you started with some sample content. This is a great way to jump-start your website by using demo content and changing it to match your brand instead of starting a new website from scratch.
Each theme is different in how they import demo content, so be sure to read the instructions on your theme’s website. This sample content will give you an idea of how to format and layout your site, including the pages and your posts, and you can delete it once you have started posting your own content.

WORDPRESS PLUGINS
One of the best parts of WordPress is there plugin system, where you can easily add new functionality to your website via free or paid plugins. One quick note is not to go overboard with plugins!
Every plugin you install has the possibility to slow down your website and cause conflict with other plugins, so only use plugins if you really need them. Also, do not install plugins with duplicate functionality- for example, having 3 different SEO plugins will actually hurt your SEO instead of helping it, so pick one.
There are thousands of plugins and which plugins you should install will depend on your theme, but some plugins I typically use are:
- Akismet Anti Spam: This plugin automatically prevents spam and bots from commenting on your posts. You might even see that as soon as you turn your website live you start getting spam comments from bots- Akismet will stop this.
- Elementor: Elementor is a page builder that lets you build your website by dragging and dropping the items on each page. It’s very easy to use and is compatible with most themes. The free version of Elementor is great on its own, and the paid Pro version adds many other features like custom pop-ups and more. I recommend starting with the free version and seeing if you need additional functionality before buying the paid version. Make sure that it is compatible with your theme, and if your theme uses a different page builder (like Divi or Visual Composer) then it might not work.
- Yoast SEO: Yoast is an SEO (Search Engine Optimization) plugin that can help you to make sure your posts and pages have proper SEO. The free version is fine to get started, and there is a paid version if you need it. You enter a keyword or phrase you are trying to rank for and follow the recommendations to make sure you are using proper SEO techniques.
- Social Pug: This is another great free plugin that adds social sharing to your sidebar and in your posts to make it easy for visitors to share your content. I would not recommend Social Warfare plugin as they recently had some security breaches.
- Monster Insights Google Analytics: Setting up Google Analytics is another very important website step for tracking your traffic, and this plugin makes it very easy to sync your website with Google to make sure everything is properly connected. Read the Google Analytics section below for information on setting up Google Analytics using the Monster Insights plugin.
- Wordfence: Wordfence is a great free plugin that protects your website from hackers and attacks. You can use the automatic configuration to easily protect your website. The free version is enough to get started so you don’t need the paid plans.
- ShortPixel Image Optimizer: ShortPixel will automatically compress and resize your images when you upload them to WordPress. While it is best to resize your images before uploading, ShortPixel can make sure you don’t accidentally load a massive 10 MB image which will dramatically slow your website down. Image compression is one of the most important parts of website speed and using a plugin like ShortPixel can make this easier. You can get 500 free image compressions a month and pay for more if you need them.
- Jetpack: Jetpack is made by the makers of WordPress and includes a lot of functionality you would need other plugins for. This includes their own image optimization, statistics, and many other features. You might eventually outgrow this plugin once you get to know WordPress better and can pick specific plugins for each task, but it’s a good starting point with lots of built-in features.
- For Siteground Users Only: SG Optimizer: One of the reasons I always recommend Siteground is their own SG Optimizer plugin. This will automatically enable a bunch of important speed optimizations for your website that you would normally need to pay a developer for. This is only available for Siteground users so do not install it if you are not on Siteground hosting.
CHANGE WORDPRESS LINK STRUCTURE
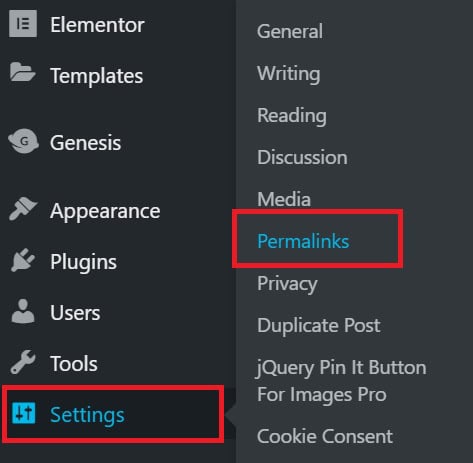
One more quick thing to do before starting to write your blog posts is to change how your blog post links appear. The default is to assign random numbers to your post, so your article would appear at yourwebsite.com/?p=2849.
This isn’t very user-friendly and isn’t good for SEO, so before you begin writing blog posts, I recommend changing this setting to “Post Name” so your blog posts will appear at yourwebsite.com/blog-post-title. You can do this from the WordPress Dashboard – Settings – Permalinks.
Scroll to Post Name and change the setting to “Post Name”
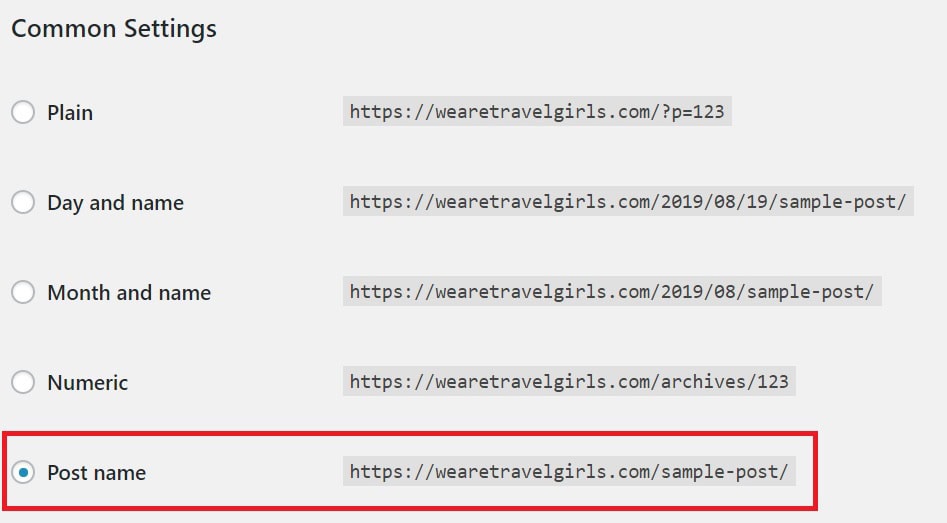
Now when you write blog posts they will automatically appear as yourwebsite.com/blog-title/. Much better for humans and Google!
UNDERSTANDING OTHER WORDPRESS FEATURES
WordPress is a fairly complicated system that has evolved over many years. There are some important early features to be familiar with that I’ve listed below. Don’t worry if these seem overwhelming at first! You will learn as you go, and you can always hire a developer if you need something specific done. For now, it’s enough to have a high-level understanding of some of the features and terminology in WordPress which I’ll cover in this section.
For each of your blog posts you’ll be able to add “Categories” and “Tags”:
CATEGORIES
Categories are broad topics that your blog posts will fit into. Ideally, you do not want too many categories, so try to keep this between 3-7. This means they should be broad and not overlap too much, so it is obvious which category each blog post will fit into.
For example, if you were doing a travel blog with posts from various destinations a good category structure could be by continent. Try to decide on your categories early on and stick to them.
Tags are more specific than categories and can be used a bit more liberally. For example, good tags for a travel blog would be countries or cities.
You can use as many tags as you want on a blog post but try to keep them related. This helps Google crawl your site and tags will tell Google that blog posts are related.
For example, if you did a blog post on Luxury Hotels in London, you would have it in the “Europe” category with several tags including “The United Kingdom,” “England,” “London,” “Hotels,” and “Luxury”.
Many bloggers do not properly use categories and tags by either using too many categories or incorrect tags. Take some time to plan your website structure with your key categories and Google will thank you for making your website easier to understand!
MEDIA LIBRARY
The Media Library is where all of your images used on your website live. You can search for specific images and add additional information such as alt-text (which is used by visually impaired website visitors). Images you add to blog posts are automatically added to your Media Library
PAGES
Pages are website pages, like your About and Contact pages. These are different from Posts (discussed below) because they are not regularly added and updated. You are free to make updates but think of Pages as static pages that won’t change much over time and are not regularly added, unlike Posts.
POSTS
Posts are your blog posts and will be key to your blog. WordPress will automatically add the date to your posts and your newest posts will show up on your homepage. You can also add categories and tags to each post (as discussed above), as well as setting the Featured Image which will be used by your theme as the preview image of the blog post.
COMMENTS
Comments are enabled by default on your Posts and not on your Pages. I recommend leaving comments enabled for Posts but having them set to manual approval. Blog comments are prime targets for spam, which is why I recommend using a plugin like Akismet meant to automatically block spam.
However, some obvious spam will still slip through so it’s best to manually approve comments before they appear on your blog. This will also bring new genuine comments to your attention so you can respond to them!
APPEARANCE
The appearance panel is where you can upload new themes (discussed above) and make general site changes. It also links to the Customizer where you easily make changes to your theme and website style, like fonts and colors. The exact options depend on your theme, but if you are using one of the recommended themes above then you should have a good amount of customization options to play with.
PLUGINS
As mentioned above, Plugins allow you to add additional functionality to your website. However, I will repeat do not go crazy adding too many plugins! You should really only add a plugin if you really need it and if it isn’t covered by an existing plugin.
Every plugin you can comes with the risk of future conflicts or security breaches if it is not properly updated, so try to only install plugins if you really need them. Stick to the list of recommended plugins above and plugins required by your theme, and if you find you are missing a feature you absolutely need that isn’t covered by an existing plugin then (and only then) should you look to adding a new plugin.
SETTINGS
Settings are where you can make site-wide changes to your website. Be careful changing settings here unless following instructions from your theme documentation or your host, because you can break your site by changing the wrong setting. The only important setting to change right away is your Permalink Structure to Post Name as described above.

WEBSITE STRUCTURE
PAGES THAT SHOULD BE ON YOUR WEBSITE
Plan out the necessary pages for your website. At a minimum, this will likely include:
- Homepage
- About Page
- Blog
- Contact Page
You should also remember to setup necessary legal-related pages that are easy to overlook:
- Privacy Policy
- Disclosures
- Terms and Conditions
You can find many sites online like GetTerms.io to help you generate boilerplate Privacy Policy, Terms and Conditions, and Disclosures pages, but be sure to customize it to your information. For example, if you are based in the United States you don’t want to say your jurisdiction is the United Kingdom because you simply copy and paste someone else’s Terms and Conditions!
*My own disclosure for this bit: I am not a lawyer and am not providing any legal advice. Please read about the specific rules and requirements based on your country.*
You can set up your website menu in WordPress Dashboard – Appearance – Menus. This will depend on your theme, but most themes have a Top Menu (top of your website), Footer Menu (bottom of your website), and Mobile Menu. Be sure to set each of these up in a logical way so your visitors can easily navigate your website.
Don’t forget to set up a mobile menu! A majority of our traffic now comes from mobile devices, so if you don’t have a mobile navigation menu setup then all these mobile users will have a very hard time navigating your site from their phones!
You can easily set up drop-down menus by putting other pages below higher pages. I recommend having your core pages on your top menu:
- Home (this can also be your logo)
- About
- Blog
- Contact
You will customize this by your blog niche. For example, if you are in Travel you might have a Destinations section with links to regions that you have blogged about.
Ideally, you want your users to be able to navigate to any page on your website within a few clicks. This is easy when you are just getting started and you only have a couple of pages and blog posts, but as your website grows and you add more blog posts it can become more difficult. That’s why planning your website structure and categories properly from the beginning will make your life much easier!
CONNECTING GOOGLE ANALYTICS & SEARCH CONSOLE
Google Analytics is a great tool for tracking your website, giving you a huge range of information about the visitors to your blog. It is essential that you connect Google Analytics to your blog not only so you can understand the traffic to your site and demographics of your readers, but so that you can share this with other people – such as brands who may want to work with you.
Google Search Console will be your essential SEO best friend! Google Search Console is a free service offered by Google that will help you to monitor, maintain, and troubleshoot your site’s presence in Google Search results.
You don’t need to connect your website to Google Analytics or Google Search Console for Google to rank you. However, you do need to connect them so that you can start optimizing your blog and improve how Google is viewing your website.
GOOGLE SEARCH CONSOLE SETUP
- Go to Google Search Console at https://search.google.com/search-console/about and click “Start Now”

- Sign in with your Google Account
- You can use your existing personal Gmail account or create a new Gmail account solely for tracking analytics (for example yourwebsite@gmail.com)
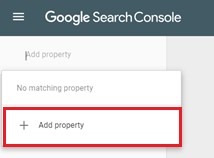
- Click “Add Property” on the top left and Add Property

- Enter your full website URL as it appears on your site including the https:// and www (if applicable)
- For example, https://yourwebsite.com or https://www.yourwebsite.com
- Note that http: and https: are considered different sites, so you should make sure to properly set up and use the https version of your website! The ‘S’ on Https: shows visitors that your site is secure so it is essential that you have this.
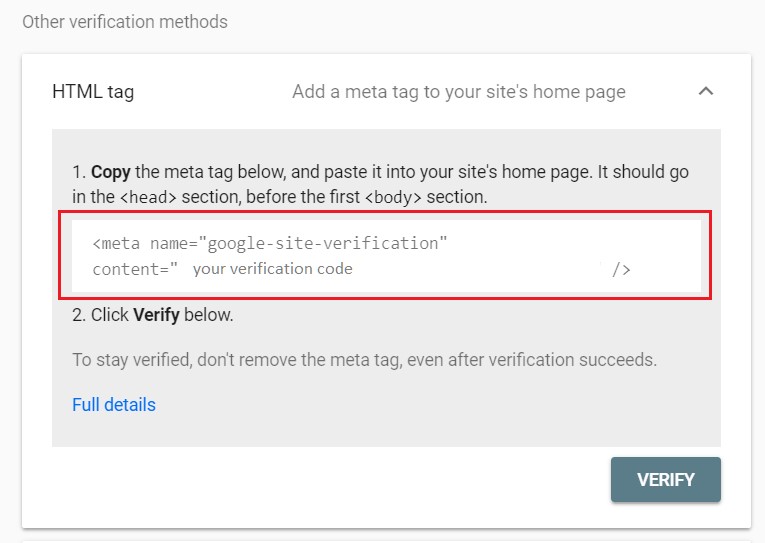
- Google will then ask you to verify you own the website you have entered:
- There are several choices, but the easiest is to use the HTML tag with Yoast (see below).
- If you do not already have the Yoast SEO plugin installed on your WordPress website, download it for free from the Plugin Library by searching for Yoast SEO.
- To verify your site ownership using Yoast:
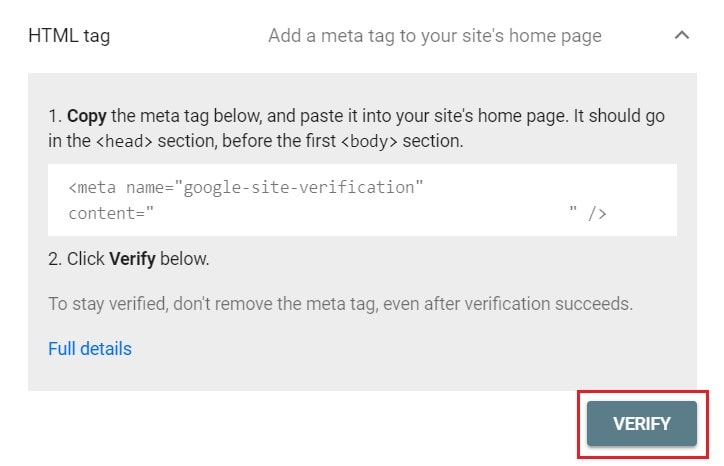
- Scroll down on the Verification tab and open the HTML tag section
- Copy all the text in the “meta tag” in the box below, including the first < and last >

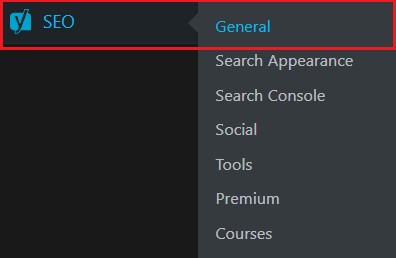
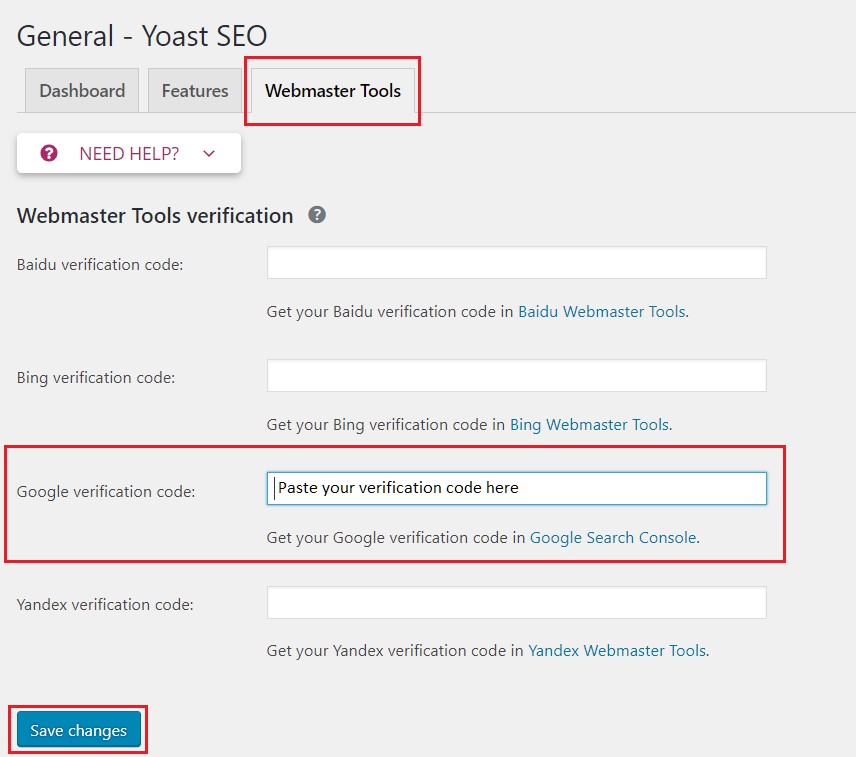
- Login to your WordPress Dashboard on your website, click on SEO on the left-hand bar, then click on General

- Click on “Webmaster Tools” and paste the meta tag code you copied into the “Google Verification” box and click “Save Changes”

- Go back to Google Search Console, click Verify and you are done! Your Google Search Console is now linked with your website.
GOOGLE ANALYTICS SETUP
- Go to Google Analytics at https://analytics.google.com/ and sign in with the same Google account you used to set up your Google Search Console

- Click Sign Up on the far right
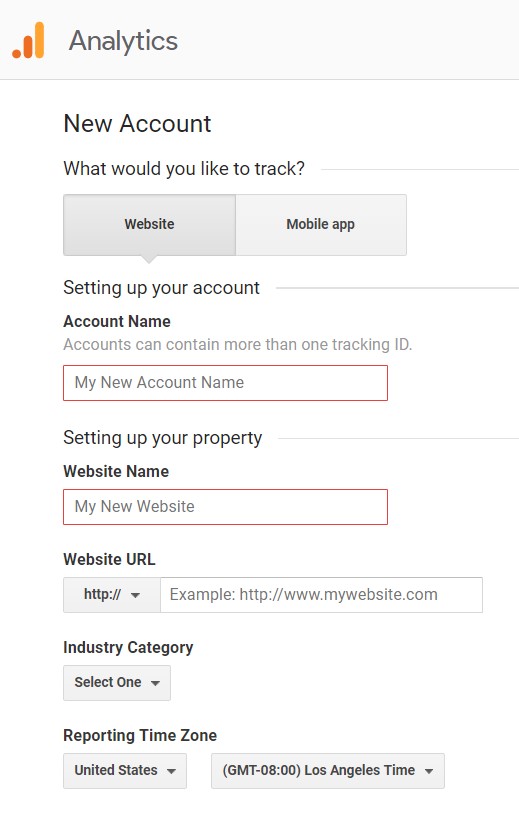
- Enter the requested information:

- Account Name: This will be the name of your Google Analytics account (Name of your website is fine)
- Website Name: This is the name of your website (can be the same as your account name above)
- Website URL: Full address of your website (make sure to switch it to https: from http:)
- Industry Category: Choose the closest category to your main website topic
- Reporting Time Zone: Choose your time zone
- Data Sharing Settings: You can read the description of each and tick or untick if you want to provide the information.
- Click “Get Tracking ID” at the bottom when finished

- You will be given a Tracking Code for your website. Leave this window open and open a new tab for your website because we will need to copy this information later.

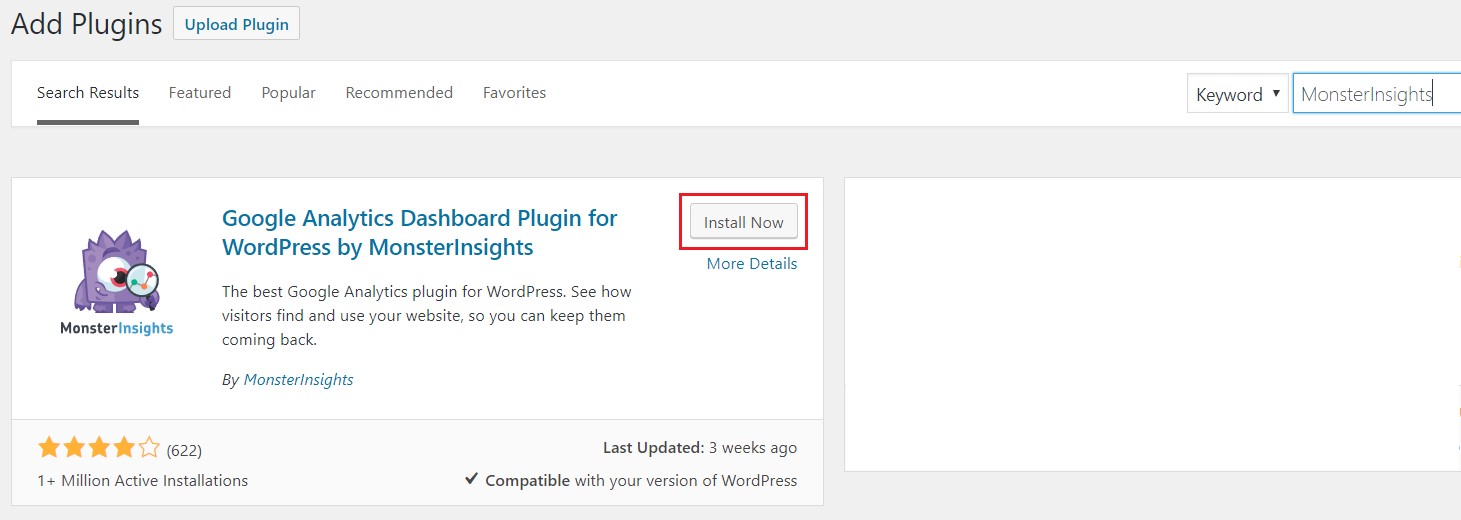
- Next, we will add the free MonsterInsights plugin to easily sync your Google Analytics account with your website. Log in to the Dashboard of your website, go to Plugins, and click Add New, then search for MonsterInsights.

- Install and Activate the MonsterInsights plugin, then go to the left-hand bar of your Dashboard, click “Insights” and “Settings”

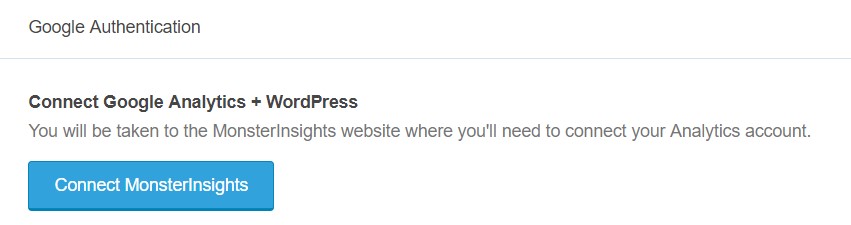
- In the General Settings, click the blue “Connect MonsterInsights” button

- This will take you back to Google where you will choose the account you logged in with to connect to Google Analytics
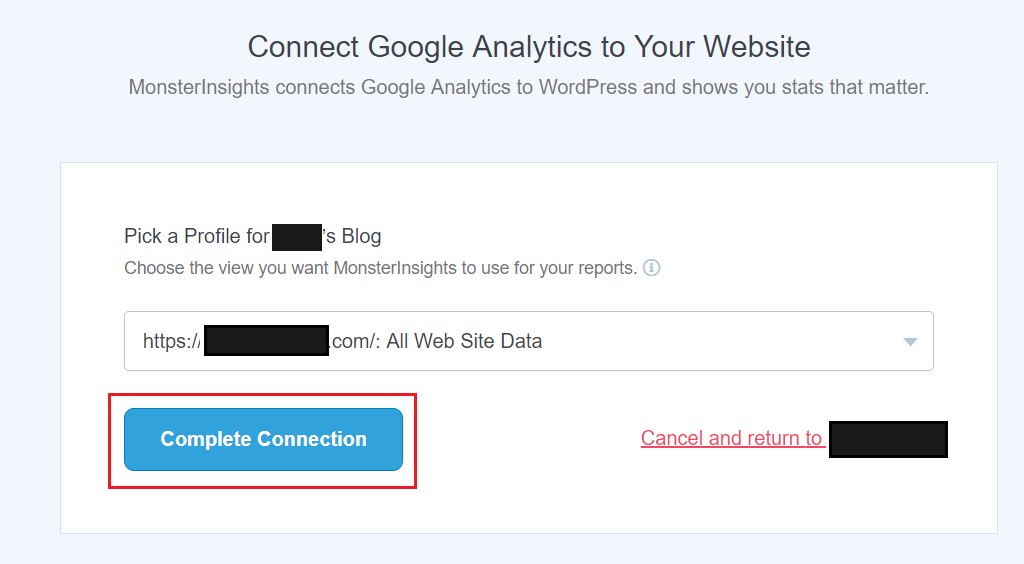
- Google will ask to verify that you want to allow MonsterInsights to access your Google Analytics account, click Allow
- Next, MonsterInsights will ask you to complete the connection. Choose your website and click “Complete Connection”

- You are done and your Google Analytics is now connected! It will take some time for Google to start tracking the activity on your website so do not worry if you don’t see metrics right away.


LINKING GOOGLE SEARCH CONSOLE AND GOOGLE ANALYTICS
Now that you have set up both Google Search Console and Google Analytics you can link them together so they can share information about your website.
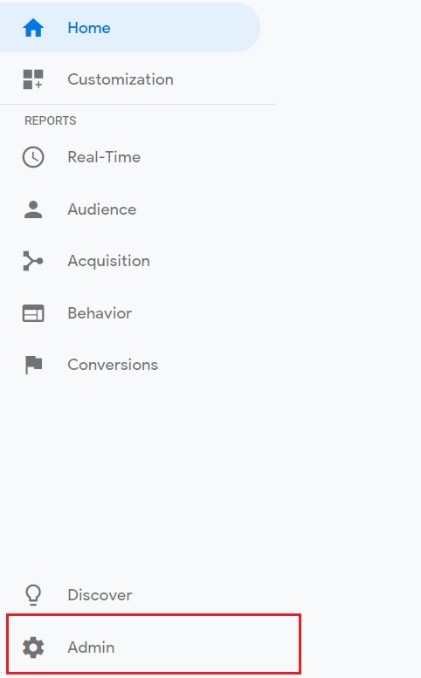
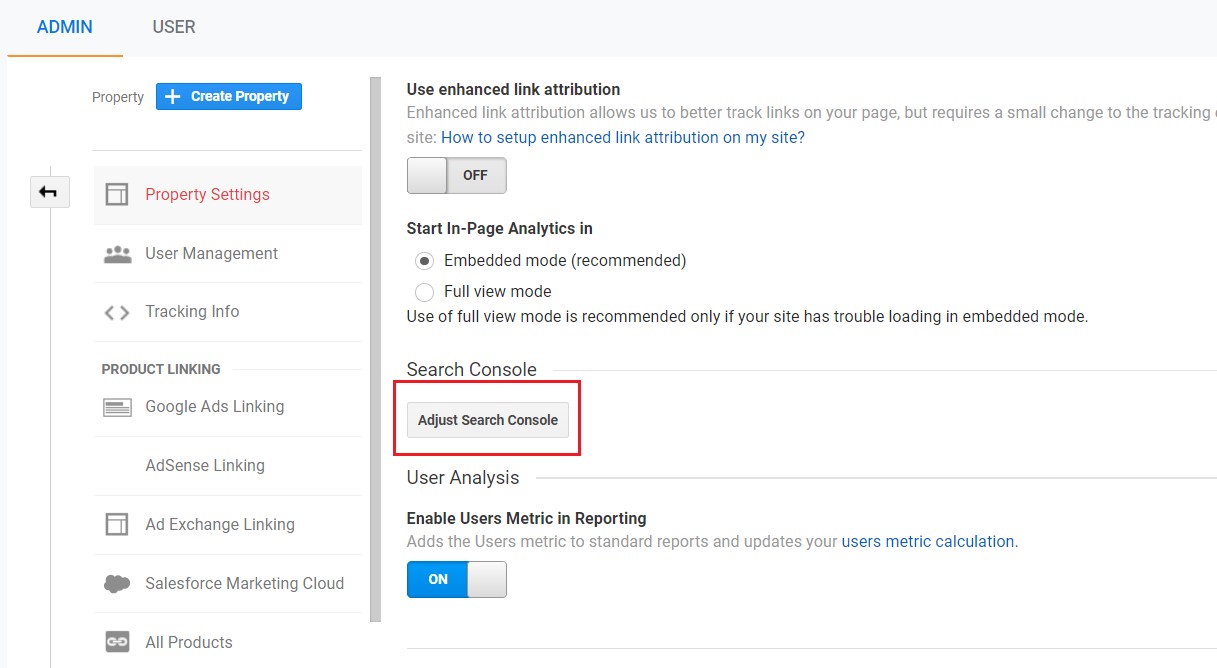
- Login to your Google Analytics account and scroll to the bottom Settings icon that says “Admin”

- Click on Admin, then go to Property – Property Settings

- Scroll down in the right window until you get to the “Search Console” area, then click “Adjust Search Console”

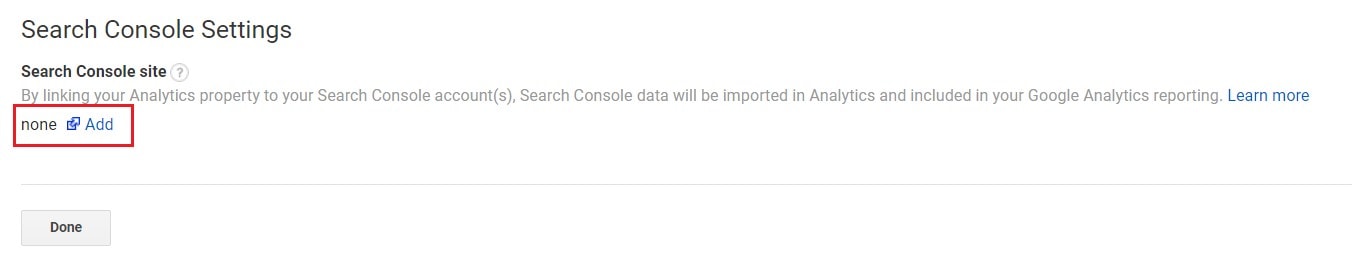
- In the Search Consoles Settings, click “Add” under Search Console site

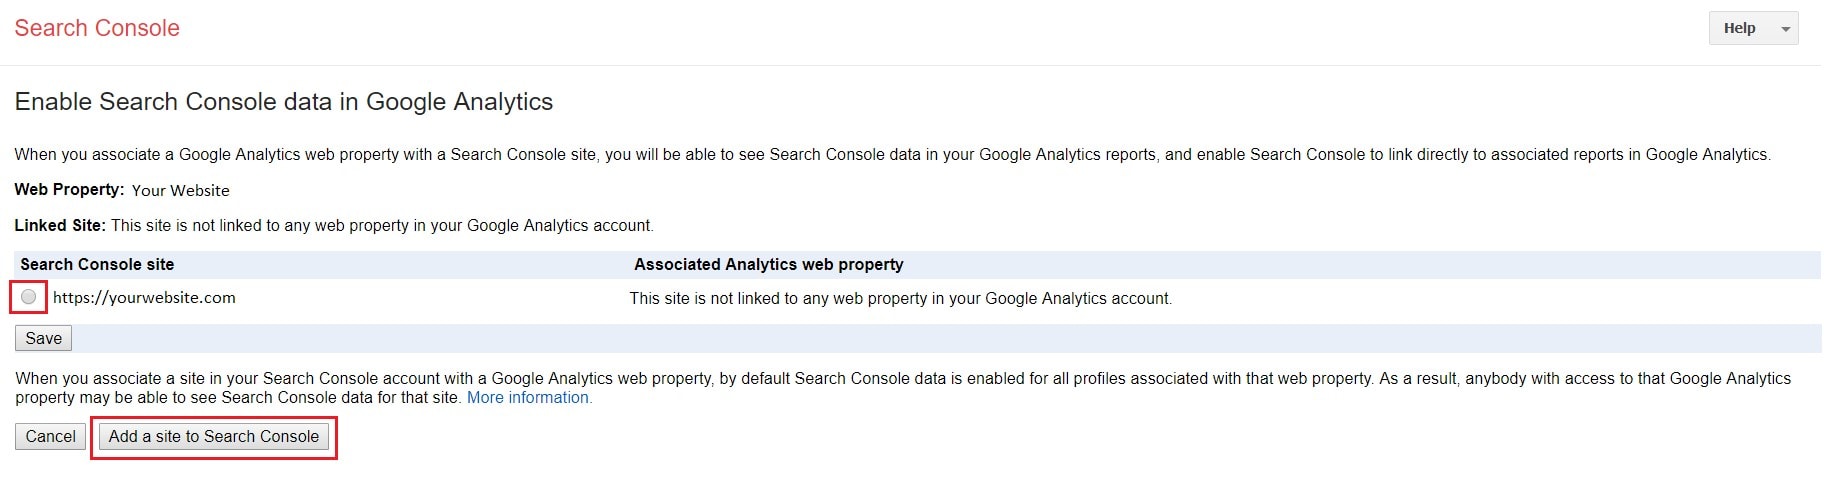
- This will open a new window in Google Search Console where you can choose your site to link with your Google Analytics. Click your site under Search Console site then click “Add a site to Search Console” and you are done!


JOIN THE BLOG ELEVATION PROGRAM!
If you made it this far, give yourself a pat on the back! You now have a brand new website set up with an awesome host, running WordPress with a beautiful theme, proper plugins, and correctly synced your website to your Google Analytics and Search Console. Now it’s time to get blogging!
There is a host of other topics to learn along your blogging journey, like SEO, defining your blogging niche, building your email list, leveraging social media, and more.
If you are looking to take your blog to the next level, you can sign up for The Blog Elevation Program where I have condensed all of my best blogging advice in an easy to follow format to help you increase your blogging income as quickly as possible!

I hope this article helped you launch your blog! Have questions or other topics you would like to learn about? Let us know in the comments below!
Blogging Resources
Pin This Article For Later

This website is a free resource and to keep it free for my readers I may use affiliate links in articles. If you make a purchase via the links on this site you will pay the same price, but I may receive a small percentage which helps me to keep bringing you new and informative content every day! Any products I endorse I personally use and love. Please see my Disclosures for more information.
This post may contain affiliate links. As an Amazon Associate I earn from qualifying purchases. I may receive a small commission when you make a purchase using my link.


